Notice: Function _load_textdomain_just_in_time was called incorrectly. Translation loading for the acf domain was triggered too early. This is usually an indicator for some code in the plugin or theme running too early. Translations should be loaded at the init action or later. Please see Debugging in WordPress for more information. (This message was added in version 6.7.0.) in /var/www/vhosts/studiogo.tech/httpdocs/upcloudold/wp-includes/functions.php on line 6131

Deprecated: Creation of dynamic property ACF::$fields is deprecated in /var/www/vhosts/studiogo.tech/httpdocs/upcloudold/wp-content/plugins/advanced-custom-fields-pro/includes/fields.php on line 138

Deprecated: Creation of dynamic property acf_loop::$loops is deprecated in /var/www/vhosts/studiogo.tech/httpdocs/upcloudold/wp-content/plugins/advanced-custom-fields-pro/includes/loop.php on line 28

Deprecated: Creation of dynamic property ACF::$loop is deprecated in /var/www/vhosts/studiogo.tech/httpdocs/upcloudold/wp-content/plugins/advanced-custom-fields-pro/includes/loop.php on line 269

Deprecated: Creation of dynamic property ACF::$revisions is deprecated in /var/www/vhosts/studiogo.tech/httpdocs/upcloudold/wp-content/plugins/advanced-custom-fields-pro/includes/revisions.php on line 397

Deprecated: Creation of dynamic property acf_validation::$errors is deprecated in /var/www/vhosts/studiogo.tech/httpdocs/upcloudold/wp-content/plugins/advanced-custom-fields-pro/includes/validation.php on line 28

Deprecated: Creation of dynamic property ACF::$validation is deprecated in /var/www/vhosts/studiogo.tech/httpdocs/upcloudold/wp-content/plugins/advanced-custom-fields-pro/includes/validation.php on line 214

Deprecated: Creation of dynamic property acf_form_customizer::$preview_values is deprecated in /var/www/vhosts/studiogo.tech/httpdocs/upcloudold/wp-content/plugins/advanced-custom-fields-pro/includes/forms/form-customizer.php on line 28

Deprecated: Creation of dynamic property acf_form_customizer::$preview_fields is deprecated in /var/www/vhosts/studiogo.tech/httpdocs/upcloudold/wp-content/plugins/advanced-custom-fields-pro/includes/forms/form-customizer.php on line 29

Deprecated: Creation of dynamic property acf_form_customizer::$preview_errors is deprecated in /var/www/vhosts/studiogo.tech/httpdocs/upcloudold/wp-content/plugins/advanced-custom-fields-pro/includes/forms/form-customizer.php on line 30

Deprecated: Creation of dynamic property ACF::$form_front is deprecated in /var/www/vhosts/studiogo.tech/httpdocs/upcloudold/wp-content/plugins/advanced-custom-fields-pro/includes/forms/form-front.php on line 598

Deprecated: Creation of dynamic property acf_form_widget::$preview_values is deprecated in /var/www/vhosts/studiogo.tech/httpdocs/upcloudold/wp-content/plugins/advanced-custom-fields-pro/includes/forms/form-widget.php on line 34

Deprecated: Creation of dynamic property acf_form_widget::$preview_reference is deprecated in /var/www/vhosts/studiogo.tech/httpdocs/upcloudold/wp-content/plugins/advanced-custom-fields-pro/includes/forms/form-widget.php on line 35

Deprecated: Creation of dynamic property acf_form_widget::$preview_errors is deprecated in /var/www/vhosts/studiogo.tech/httpdocs/upcloudold/wp-content/plugins/advanced-custom-fields-pro/includes/forms/form-widget.php on line 36

Notice: Function _load_textdomain_just_in_time was called incorrectly. Translation loading for the all-in-one-wp-migration domain was triggered too early. This is usually an indicator for some code in the plugin or theme running too early. Translations should be loaded at the init action or later. Please see Debugging in WordPress for more information. (This message was added in version 6.7.0.) in /var/www/vhosts/studiogo.tech/httpdocs/upcloudold/wp-includes/functions.php on line 6131

Deprecated: str_replace(): Passing null to parameter #3 ($subject) of type array|string is deprecated in /var/www/vhosts/studiogo.tech/httpdocs/upcloudold/wp-content/plugins/wp-super-cache/wp-cache-phase2.php on line 54

Deprecated: strtolower(): Passing null to parameter #1 ($string) of type string is deprecated in /var/www/vhosts/studiogo.tech/httpdocs/upcloudold/wp-content/plugins/wp-super-cache/wp-cache-phase2.php on line 828

Notice: Function _load_textdomain_just_in_time was called incorrectly. Translation loading for the rocket domain was triggered too early. This is usually an indicator for some code in the plugin or theme running too early. Translations should be loaded at the init action or later. Please see Debugging in WordPress for more information. (This message was added in version 6.7.0.) in /var/www/vhosts/studiogo.tech/httpdocs/upcloudold/wp-includes/functions.php on line 6131

Deprecated: Creation of dynamic property acf_field_oembed::$width is deprecated in /var/www/vhosts/studiogo.tech/httpdocs/upcloudold/wp-content/plugins/advanced-custom-fields-pro/includes/fields/class-acf-field-oembed.php on line 31

Deprecated: Creation of dynamic property acf_field_oembed::$height is deprecated in /var/www/vhosts/studiogo.tech/httpdocs/upcloudold/wp-content/plugins/advanced-custom-fields-pro/includes/fields/class-acf-field-oembed.php on line 32

Deprecated: Creation of dynamic property acf_field_google_map::$default_values is deprecated in /var/www/vhosts/studiogo.tech/httpdocs/upcloudold/wp-content/plugins/advanced-custom-fields-pro/includes/fields/class-acf-field-google-map.php on line 33

Deprecated: Creation of dynamic property acf_field__group::$have_rows is deprecated in /var/www/vhosts/studiogo.tech/httpdocs/upcloudold/wp-content/plugins/advanced-custom-fields-pro/includes/fields/class-acf-field-group.php on line 31

Deprecated: Creation of dynamic property acf_field_clone::$cloning is deprecated in /var/www/vhosts/studiogo.tech/httpdocs/upcloudold/wp-content/plugins/advanced-custom-fields-pro/pro/fields/class-acf-field-clone.php on line 34

Deprecated: Creation of dynamic property acf_field_clone::$have_rows is deprecated in /var/www/vhosts/studiogo.tech/httpdocs/upcloudold/wp-content/plugins/advanced-custom-fields-pro/pro/fields/class-acf-field-clone.php on line 35

Deprecated: Creation of dynamic property jh_acf_field_table::$settings is deprecated in /var/www/vhosts/studiogo.tech/httpdocs/upcloudold/wp-content/plugins/advanced-custom-fields-table-field/class-jh-acf-field-table.php on line 23
UpCloud

How to set up a private VPN Server using UpCloud and UTunnel

benefit-4

UTunnel is an easy-to-setup VPN as a Service (VPNaaS) provider, offering robust VPN and Zero Trust networking solutions targeted towards small and medium businesses. UTunnel enables easy VPN server deployment and administration, as well as trouble-free user management.

UTunnel offers two options to set up your VPN server on UpCloud: the Integrated Cloud option and Bring Your Own Server(BYOS or on-premise) option. In this tutorial, we will discuss how to set up a VPN server on UpCloud VPS using both of the above options.

Signing up with UTunnel

To start with, head over to utunnel.io and sign up for an account using the Sign Up button at the top right corner.

Get started with UTunnel

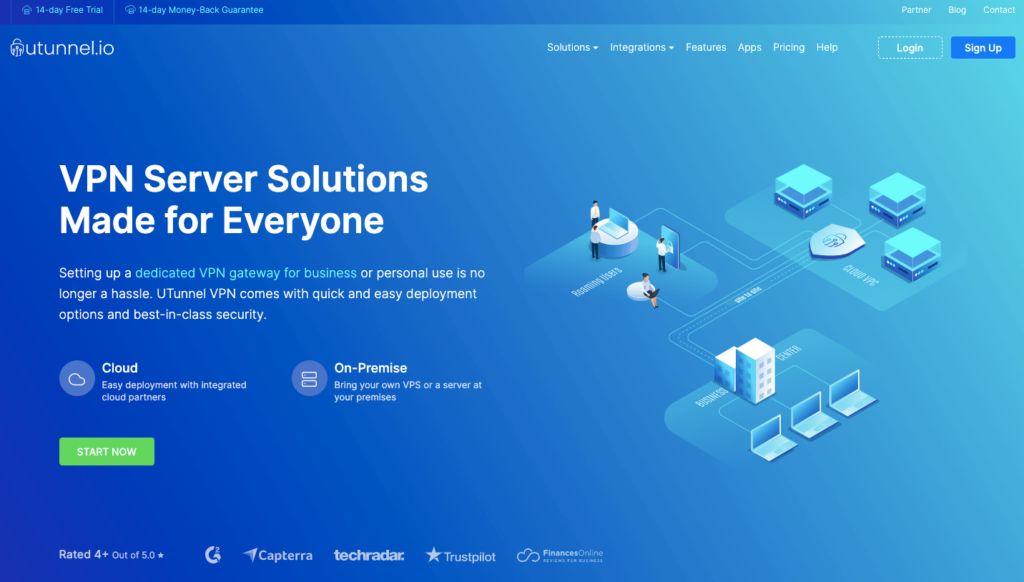
You can choose to sign up for an Individual or Organization account based on your requirements. An organization account comes with many business-centric capabilities like team management, single sign-on, site-to-site tunnelling etc. to list a few.

Signing up with UTunnel

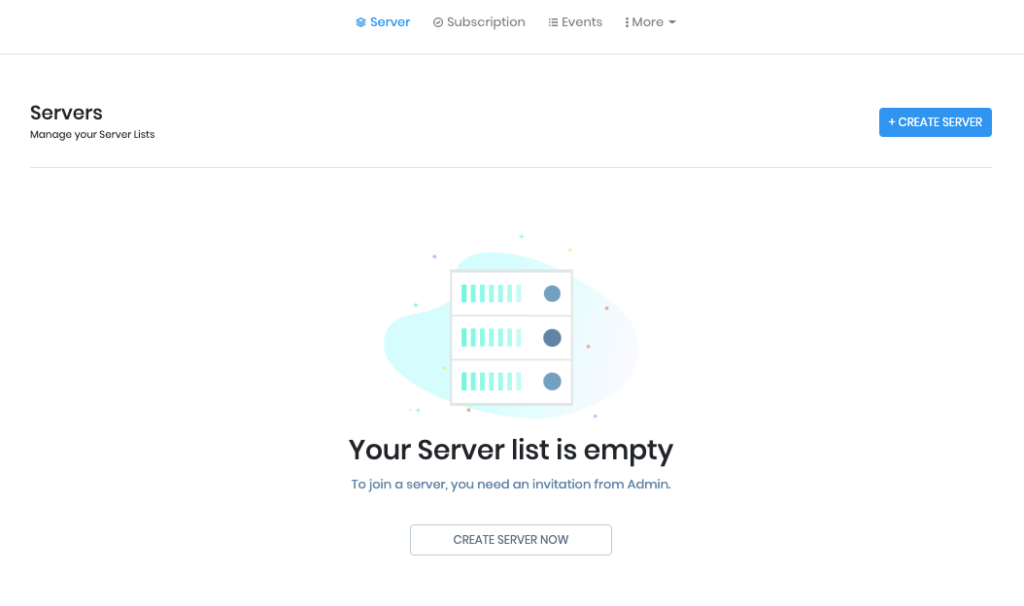
Once you've registered and logged into your UTunnel account, you can start creating your first VPN server.

1. Integrated Cloud Option

The integrated cloud option is the easier of the two options to deploy your UpCloud VPN server as it offers a fully automated VPN server deployment. You can set up the VPN server with just a few clicks without the need to execute a single command. You can follow the steps below to set up a VPN server using this option.

Deploying the VPN Server

Deploying a VPN server on UpCloud using UTunnel’s automated deployment process is quick and easy. To set up a new VPN server, while on your UTunnel dashboard, click the Create Server button on the top right portion of the page.

UTunnel dashboard

The server creation page lets you choose your subscription type, server specifications and the number of user licenses. You can find the option below:

  • Select package - Select your package(Basic/Standard) based on your requirements
  • Server type - Choose your server type to be Cloud
  • Server name - Provide an easily identifiable name as the server name
  • Provider - Select the provider as UpCloud
  • Location - Choose a server location from the available geolocations
  • Instance type - Select an instance type depending on your requirements.
  • VPN accounts -  Choose the number of VPN user licenses required on the server.
Creating cloud VPN server with UTunnel

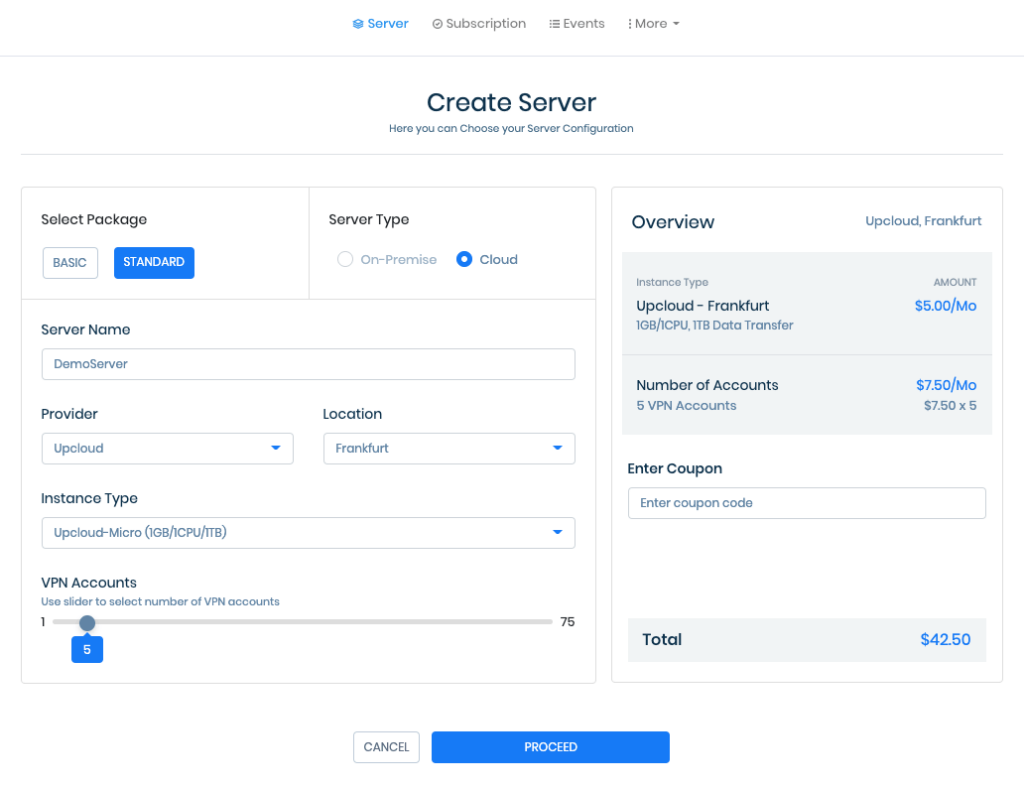
Click on the Proceed button once you have made your choices. You will then be presented with an Order Summary page to confirm the details. Click on Proceed to make the payment.

Once you have made the payment, your VPN server in UpCloud will be deployed and ready in a couple of minutes. You can now install the UTunnel VPN client apps to connect to your newly created VPN server in UpCloud. You can also manage the users and teams who would need access to the VPN server from the UTunnel dashboard.

2. Bring Your Own Server(BYOS) / On-Premise Option

Bring your own server option lets you deploy a VPN server on a cloud VPS in your own UpCloud account. You will require an UpCloud VPS running Ubuntu 20.04 to install a UTunnel VPN server. The steps to deploy an UpCloud VPN server using the BYOS or on-premise option are as follows:

Signing up with UpCloud

If you have not yet registered on UpCloud, begin by getting signed up.

Deploying an UpCloud server

Setting up a new server on UpCloud is an easy process. You can start the process by logging into your UpCloud Control Panel and select to Deploy a server under the Servers section.

The deployment page shows many options for customizing a new cloud server.

  1. Location - You can choose your server location from the list of available data centres
  2. Plan - Select a plan that works according to your requirements.
  3. Storage - Choose a storage size depending on your usage 
  4. Operating System - Select Ubuntu 20.04 as the operating system
  5. Server hostname and description - Choose an identifiable name for your server as the server name

You can find more detailed instructions on server deployment at the UpCloud newcomer’s tutorials.

Go ahead with deploying your server when you've finished configuring the server settings. Once the new server is created, do not forget to note down the IP address of the newly created UpCloud instance.

Setting Up your UpCloud VPN server with UTunnel

Sign up and log in to your UTunnel account dashboard. If you do not have an account, go ahead and sign up for a Personal or Organization account.

After logging into your UTunnel account, continue by creating a new VPN server by clicking the Create Server button on your account homepage. You can now customize your subscription and server specifications as:

  • Select Package - Select a package that best suits your requirements
  • Server Type - Choose the server type as on-premise
  • Server Name - Select an identifiable name for your server
  • IP Address - Input the IP address of your newly created UpCloud instance.
  • VPN accounts - Choose the number of VPN user licenses required on the server.
Creating VPN server to connect on-premise server

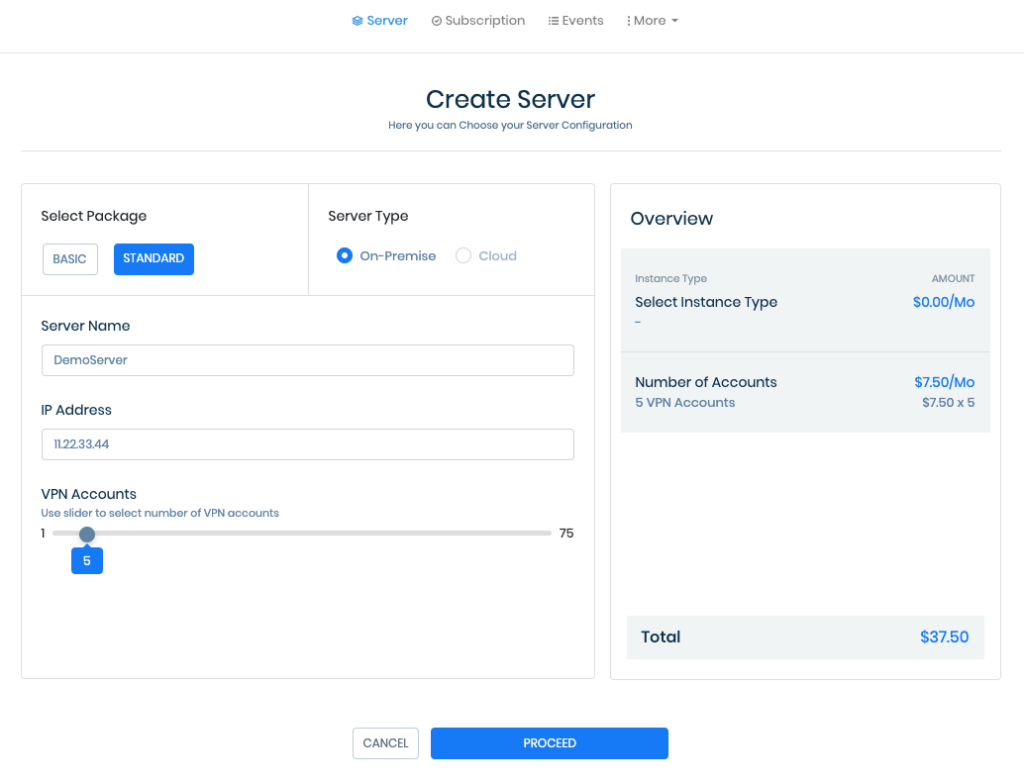
You can click on Proceed to view the order summary. Proceed and make the payment and you will get a server registration token. You will need this token to register your VPN server.

UTunnel server registration token

Registering Your Server

The next step is to register your cloud server. To do this, you first need to connect your server via SSH and run the following commands. 

Create a directory named utunnel and make it the current working directory

sudo mkdir /utunnel && cd /utunnel

Then download the required files and extract them

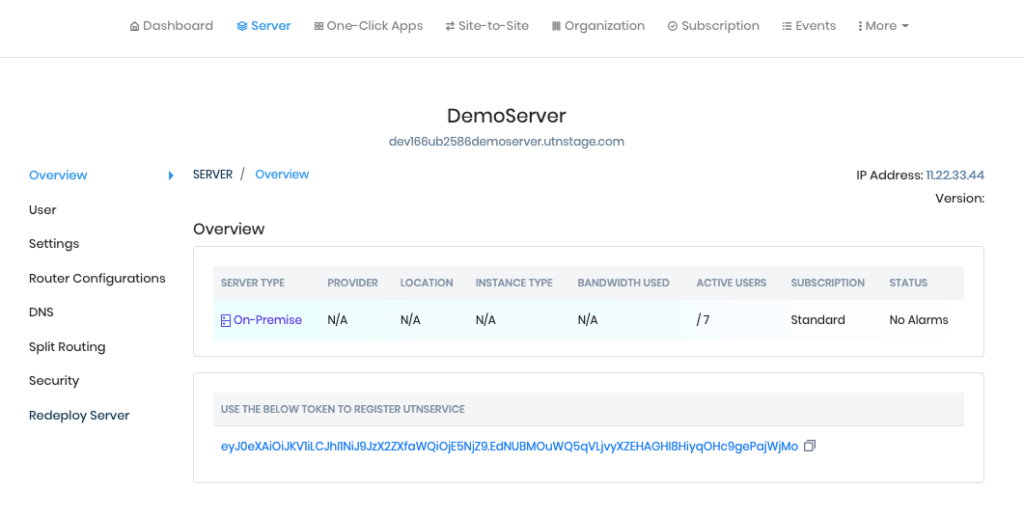
sudo wget https://files.utunnel.io/production/deploy/install_bundle_20.tar
sudo tar -xf install_bundle_20.tar

Register your UpCloud VPN server after replacing YOUR_REG_TOKEN with the registration token you received at the VPN server overview as shown in the screenshot above.

sudo /utunnel/bin/utnservice register YOUR_REG_TOKEN

Lastly, start the VPN server

sudo /utunnel/bin/utnservice start

That's it! you have now successfully deployed a UTunnel VPN server on your UpCloud VPS using the BYOS option.

You can now install the UTunnel VPN client apps and connect to your newly created VPN server on UpCloud. You can manage the users and teams who would need access to the VPN server from the UTunnel dashboard.

No comments yet.

Leave a Reply

Your email address will not be published. Required fields are marked *

Find out what makes our Cloud servers so boring

No? Experience the UpCloud special treatment and try our next generation, high-performance and resilient Cloud servers with no drama, worries or commitment.